Hot Gas Error Message
Symptom – Hot Gas Error Message

Troubleshooting service and repairs to be conducted only by authorized and trained professionals!
Hot Gas Error Message Explanation:
The Hot Gas error message will appear on unit when the outlet thermistor reaches ~115°F for more than one-minute while the compressor is running. The built-in safety features will proceed to disable that individual barrel until that error message is addressed.
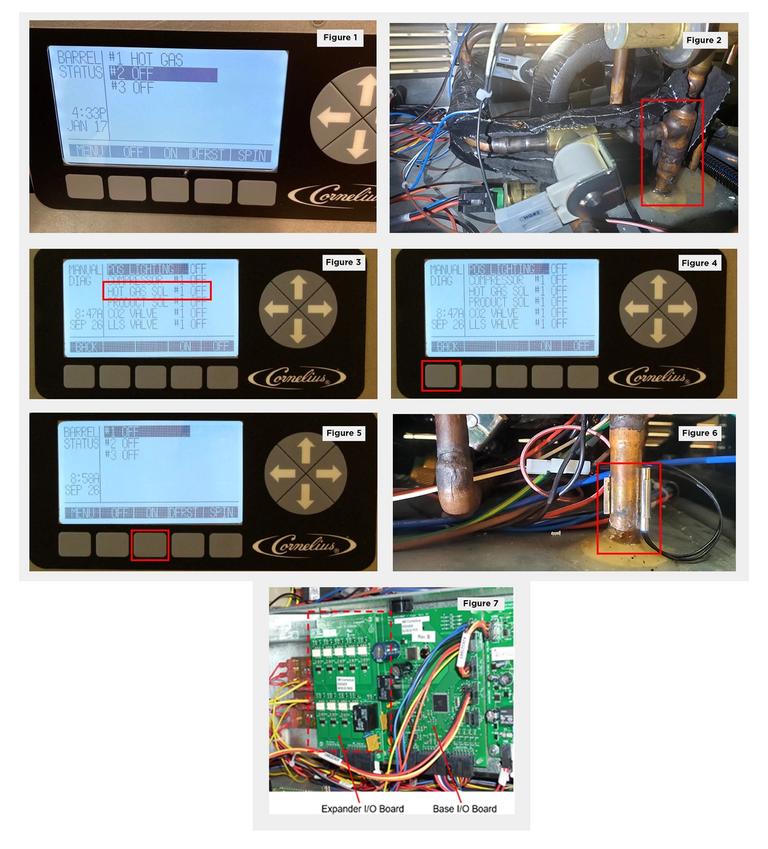
See Figure 1
Potential Failure Modes:
- Hot gas solenoid leaking through
- Faulty evaporator outlet thermistor
- Evaporator outlet thermistor not making good contact. Rusted clip or dried heat transfer paste
- Bad Harness Connection or IO Board
Recommended Troubleshooting Steps:
Identify Hot Gas leak
With the barrel(s) identified from Error log there are two methods to confirm leaking.
- Defrost all barrels and then stop the refrigeration system (shut it off).
- Use either Method 1 or Method 2 to diagnose and locate the leaking valve
- Method 1 - Purge suspect barrel(s) of product and remove front faceplate assembly, beater bar and scraper blades. Next turn on only the barrel with product and allow to refreeze. With refrigeration system running carefully place hand to the inside, top rear of the empty non running barrel. If a Hot Gas valve is leaking the surface of the barrel will feel warm to the touch. CAUTION: surface may be HOT!
- Method 2 – Without purging any product, remove side panel(s). Locate suspect Hot Gas valve and carefully peel back insulation. Turn refrigeration system back on for the other barrel except the suspect barrel, leaving the suspect barrel from the error log OFF. Carefully place hand on the copper tubing between the Hot Gas valve and the evaporator (foam pack), if the copper tubing feels warm it is leaking past the Hot Gas valve. CAUTION: tubing may be HOT!
See Figure 2
- Potential Cause – Hot Gas Valve not Opening and Closing Properly
The identified leaking hot gas valve may have debris in the seat area as part of the sealed refrigeration system that is preventing it from operating properly. It may be possible to clear the debris from the seat area and then be captured in the filter/dryer. To do this pulse the Hot Gas valve on/off by going into the screen menu:
MENU > MAINT > MANUAL DIAG > HOT GAS SOL#
Now cycle Hot Gas solenoid ON for 10-15 seconds and then turn it OFF. Complete this 5 times. During this process, you will hear a click activation and refrigeration flowing through. Repeat this process if you have Hot Gas Error Messages on additional barrels.
See Figure 3
Example: If Error message was found in Barrel #1 scroll down to HOT GAS SOL #1
- After going through the cycling of Hot Gas Solenoid (5 times 10-15 seconds between cycles), keep pressing the Back button to return to the MAIN screen.
See Figure 4
- At the MAIN Screen, proceed to turn each barrel with product back ON and close merchandiser door.
See Figure 5
Next repeat Method 1 or Method 2 to again check for a leaking hot gas valve. If no leaking is found after pulsing, the debris was cleared and unit can be put back into operation.
***If a Hot Gas valve is still leaking the unit will need to be shut down and the Hot Gas valve replaced using proper refrigeration system procedures***
Potential Cause – Faulty Thermistor
When a Hot Gas Error is found in the error log history. And after checking Hot Gas valve(s) for leaking with no leaks detected (Method 1 or Method 2) and still getting the Hot Gas Error message. It is possible the unit has an improper reading thermistor located on the evaporator (foam pack) outlet copper tubing. To properly check a thermistor, you will need a Volt/Ohm meter.
See Figure 6
1. Shut the unit off and remove side panel(s). Locate the thermistor for the barrel(s) triggering the Hot Gas error and carefully peel back the insulation.
2. After removal of insulation, make sure the thermistor is properly positioned and mounted to the copper tube in order to provide accurate reading. There should be no rust or dried paste between thermistor and copper line. If needed, provide adequate amount of thermal paste.
3. Unplug the two-wire connector and unclip the thermistor from the copper tubing. Save the clip and thermo paste for reuse.
4. Using a glass of 32F ice water, fully submerse the thermistor and stir the ice water for 1 minute.
5. Using an ohm meter measure across the two wires of the thermistor. A good thermistor will be 16.3K +/- 5% (15.5K to 17.1K). If the thermistor is out of specification, it should be replaced.
6. The insulation must be sufficient and snug, leaving no air gaps or opening.
IV. Potential Cause – Bad Harness Connection or IO Board
If no leaking hot gas valve is detected and the thermistor on the evaporator outlet has been tested and found to be in spec, it is possible a shorted or pinched wire(s) in the unit harnessing could also cause the Hot Gas Error. After checking for a leaking h\Hot Gas valve, defective thermistor and wiring harness problems it is possible it could be a defective IO Board.
See Figure 7
The IO Board sends and receives voltage and ohm values for components such as the Hot Gas valve and thermistor. The replacement of this board should be a last resort
If problems persist, please contact Cornelius Customer Service @ (800) 238-3600